

ChatGPT with WordPress Plugin: A Comprehensive Guide
Updated at Jun 27, 2026
6 min to read
Looking to upgrade your website seriously and wow the visitors by creating a WordPress chatbot? You’ve landed at the right spot.
Chatbots are like personalized virtual assistants! These AI assistants can have natural conversations to guide and engage users 24/7.
Nimblework says Businesses can save up to 30% on support costs with bots. Talk about ROI!
If you want to boost customer experience and stand out from the competition, adding a chatbot is the way to go. The best part is you don't need any coding skills! There are awesome WordPress plugins that make it simple.
In this guide, we'll explore the top chatbot plugins, customization options, and tips to optimize performance. Whether you're a business owner, blogger, or ecommerce store, our step-by-step walkthrough will turn you into a chatbot pro!
Get ready to take your WordPress site to the next level with a virtual assistant that delights visitors 24/7. The future of engaging experiences is here - let's chat bots.
Below are the reasons why you should create a chatbot in WordPress.
User experience is the holy grail of any successful website. And chatbots?
Oh, they are the wizards of user experience! With WordPress chatbot development, you can provide instant and personalized assistance to your visitors.
Whether answering queries, recommending products, or guiding them through your content, chatbots create a seamless and delightful user journey.
Let's face it. Customer support can sometimes be a daunting task.
But fear not! WordPress chatbot is here to rescue you from the customer service abyss. With a WordPress chatbot development on your website, you can automate responses to common questions, freeing your time to focus on more complex issues.
Plus, chatbots are available 24/7, ensuring customers never have to wait for assistance.
Repetitive tasks got you feeling like a hamster on a wheel?
Say no more! Chatbots are masters of automation. They can handle tasks like lead generation, appointment scheduling, order tracking, and more.
By delegating these mundane tasks to your trusty chatbot, you can save time, streamline your operations, and focus on what truly matters.
Ah, the sweet sound of conversions! WordPress chatbot has the power to turn visitors into customers.
Chatbots can guide your audience through the buying process, provide product recommendations, and address concerns or objections by engaging with your audience in real time.
This personalized approach builds trust, boosts confidence, and increases conversion rates.
Here are easy steps to create your chatbot in WordPress.
First things first, select the chatbot plugin that best fits your needs.
Research and compare the options we discussed earlier, and choose the one that aligns with your goals and requirements.
Once you've made your choice, installing the plugin is a piece of cake.
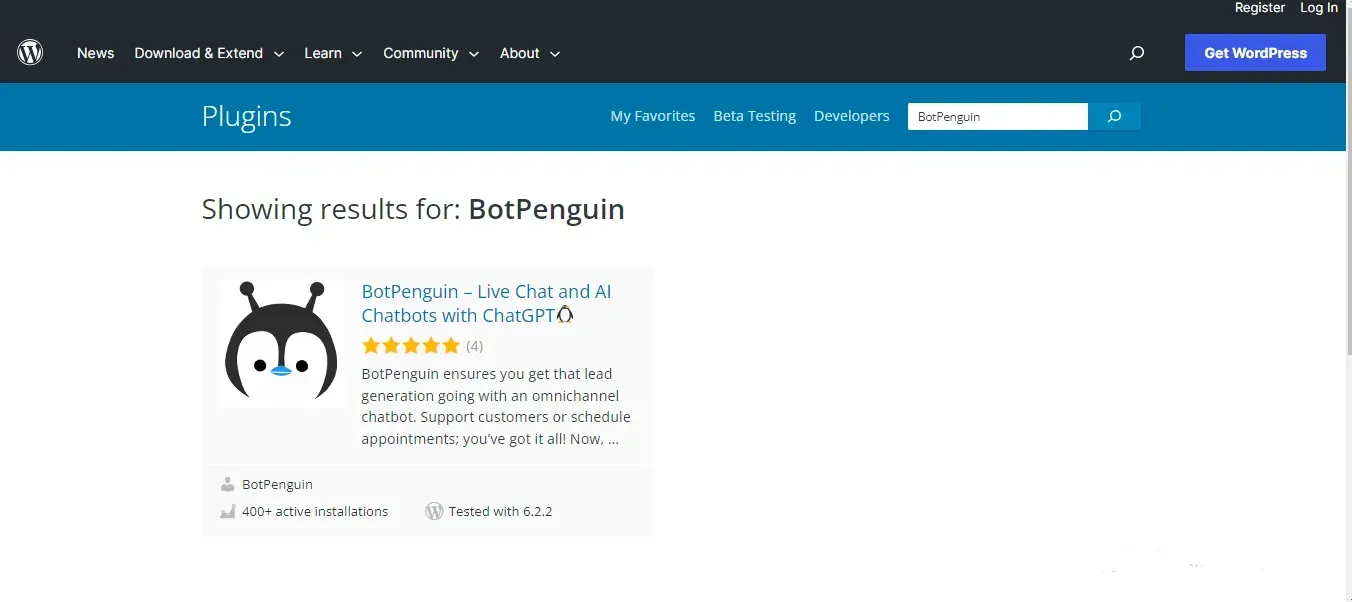
Navigate to your WordPress dashboard, go to the plugins section, and click "Add New."
Search for your chosen plugin,
click "Install," and activate it.
After installing the chatbot plugin, it's time to configure the basic settings. This includes general settings like chatbot name and greetings, language and localization settings, and appearance and design settings. Customize these settings to make your chatbot feel like a natural extension of your website.
Now, the real fun begins! Start by defining the user goals and scenarios you want your chatbot to address. Craft conversational messages that resonate with your audience and guide them through their journey.
Set up conversation paths and triggers to ensure a smooth and engaging chatbot experience.
Give your chatbot a makeover! Choose a chatbot template that suits your website's style and personality. Customize colors and fonts to match your brand's visual identity. And remember to add those little branding elements that make your chatbot uniquely yours.
If you use external platforms like customer relationship management (CRM) systems or e-commerce tools, consider integrating your chatbot with these platforms.
This allows your chatbot to seamlessly access and utilize data from these systems, providing a more personalized and efficient experience for your users.
Before launching your chatbot to the world, testing its conversational flows and optimizing its performance is crucial. Put yourself in your users' shoes and converse with your chatbot. Identify any hiccups or areas for improvement and refine the chatbot's responses accordingly.
Remember, a well-optimized chatbot can be a game-changer for your website.
And if you need an ally to guide you hand-in-hand throughout the process, meet BotPenguin, the home of chatbot solutions. Whether be WordPress Chatbot or social media platform chatbot, BotPenguin has got too much to offer:
Also Read:
Here is the step to understand how to use a WordPress chatbot:
Once your WordPress chatbot is running, you must activate it on your website. Depending on the chatbot plugin you've chosen, this process may vary.
Generally, you'll find an option in your WordPress dashboard to enable the chatbot and make it visible to visitors.
Before your chatbot goes live, testing its conversational flows is crucial. Engage in various conversations with your chatbot to ensure it understands user queries and provides accurate and relevant responses.
Identify any areas for improvement and make necessary adjustments to enhance the chatbot's performance.
Ensure your visitors know about the chatbot's existence and how it can assist them. Promote the chatbot on your website by placing eye-catching call-to-action buttons or banners in strategic locations.
Use engaging copy to entice visitors to engage with the chatbot and benefit from its features.
Keep a close eye on your chatbot's interactions and gather valuable insights. Most chatbot plugins provide analytics and reporting features that allow you to track user engagement, popular queries, and user satisfaction levels.
Utilize this data to refine your chatbot's performance and make data-driven improvements.
Creating a chatbot is an ongoing process. Continuously iterate and optimize your chatbot based on user feedback and analytics.
Pay attention to user patterns, frequently asked questions, and pain points to improve the chatbot's conversational flows and provide a more personalized and practical user experience.
Also Read:
Creating a chatbot in WordPress is not just about its functionality; it's also about designing an experience that users will love. Follow these best practices to ensure your chatbot delivers exceptional results.
Design your WordPress chatbot that mimics like human conversation. Use friendly and conversational language that resonates with your target audience. Avoid overly formal or robotic tones. Inject a bit of personality and even humor to create a warm and engaging experience.
WordPress chatbot development makes it easy for users to navigate and interact with your chatbot. Provide clear instructions on how to use the chatbot's features and guide users through their options. Use buttons or quick reply options to offer predefined choices, making it simple for users to select their desired actions.
With WordPress chatbot development, you can leverage user data to provide personalized experiences. Tailor responses based on user preferences, previous interactions, or any available information. Show users that you understand their needs and provide contextual assistance that feels relevant and helpful.
While WordPress chatbot development is a fantastic way to handle every user query or concern. Implement a seamless handoff to human support when needed. If a user requires more in-depth assistance, ensure a clear pathway to connect with a human representative who can provide personalized support.
Chatbots are more than just functional tools; they bring interactivity and personality to your website. By being conversational, natural, and friendly in your chatbot's responses, you can create a personalized and engaging experience for your visitors.
The benefits of using a chatbot on your WordPress site are vast. Not only will it improve customer support by providing instant responses and solutions, but it will also increase conversions by guiding users through the purchase process. Your chatbot will become an invaluable asset, enhancing user experience and making your site stand out.
Meet BotPenguin: Your top-notch, always-on WordPress ally! Think of it as that tech-savvy friend who's got your back 24/7, transforming website visits into hot leads and real-deal sales.
It's as easy as pie: plug, play, profit! Hook it up to your WordPress site with zero coding required. And remember, it's not just a bot — it's a practical, tireless solution to your online customer engagement woes.
So, ready to give your WordPress site the chatty superstar it deserves?
Can I create a chatbot in WordPress without any coding knowledge?
Yes, you can! WordPress offers user-friendly chatbot plugins that don't require coding skills. You can create and customize your chatbot using intuitive interfaces and pre-built templates.
How can a chatbot benefit my WordPress website?
A chatbot can enhance user experience, provide instant customer support, increase engagement, and even boost conversions on your WordPress website. It automates interactions, answers FAQs, and guides visitors through their journey.
Can I customize the appearance and design of my chatbot?
Absolutely! Most chatbot plugins allow you to customize the appearance of your chatbot. You can choose templates, adjust colors and fonts, and add branding elements to ensure your chatbot aligns with your website's aesthetics.
How do I activate the chatbot on my WordPress site?
After installing the chatbot plugin, activating it is usually a straightforward process. Navigate to your WordPress dashboard, locate the chatbot plugin's settings, and enable the chatbot to make it visible on your website.
Subscribe to Our Newsletter
Get the latest business insights straight into your inbox.
Checkout our related blogs you will love.
Updated at Jun 27, 2026
6 min to read

Updated at Jun 23, 2026
4 min to read
Updated at Jun 3, 2026
8 min to read
Updated at Jun 1, 2026
6 min to read
Updated at May 29, 2026
4 min to read
.webp)
Updated at May 27, 2026
15 min to read
Table of Contents