Your website visitors leave without talking to you.
Learn how to create a chatbot for website that stops them cold.
They arrive with a question, scan for an answer, find nothing fast enough, and bounce. No email captured. No lead qualified. No sale. Just gone.
A chatbot changes this. It greets them instantly. Answer their questions. Captures their details. Book their meeting. All without you lifting a finger.
The best part? You don't need a developer or budget. You can add a working chatbot in minutes—no code required.
This guide shows you how. Step by step. Platform by platform. With the exact decisions and mistakes that separate chatbots that convert from chatbots that collect dust.
How Website Chatbots Work
Now that you understand the problem, let's look at what actually happens when a visitor interacts with your chatbot. Every chatbot that works operates through five layers. Understanding this model helps you configure correctly and know why each setting matters.
Layer 1: Trigger
The trigger decides when your chatbot appears on the page.
Your visitor lands on your website. The trigger determines the exact moment the bot shows up. It could appear immediately. It could wait five seconds. It could wait until scroll. It could appear on exit intent.
When to use each trigger:
- Page load: pricing pages, product pages, high-intent visitors
- 5-10 second delay: blog posts, educational content, patience-building
- Exit intent: checkout pages, bounce prevention, last-minute offers
- Scroll-based: long-form content, engagement-based timing
The right trigger keeps your chatbot helpful without being annoying.
Layer 2: Understanding
The understanding layer is where the bot processes what your visitor typed.
Rule-based chatbots match keywords. Visitor types "price" → bot serves pricing response. Predictable. Reliable. Works for simple questions.
AI chatbots use natural language understanding. They grasp intent, not just keywords.
When you create a chatbot for website that handles varied questions, AI understanding becomes critical. Your visitors won't follow a script.
Layer 3: Answer
The answer layer delivers the response to your visitor.
Rule-based chatbots: Answers come from scripts you wrote. You control everything. Nothing surprises you.
AI chatbots: Answers come from a knowledge base. You feed the AI:
- Website content
- FAQ documents
- Pricing pages
- Support emails
- Product information
The response feels natural. But it stays grounded in your actual content.
This is why training your AI chatbot correctly matters. Bad training data produces bad answers. Good training data produces helpful responses.
Layer 4: Action
The action layer makes your chatbot actually do something useful.
After the chatbot answers, it can trigger an action. It converts conversation into business outcome.
Common actions:
- Capture leads with a form
- Book appointments via calendar integration
- Show product recommendations
- Push data to your CRM
- Send messages to support team
- Collect email for newsletter
Without actions, your chatbot answers questions but doesn't convert anything.
Layer 5: Handoff
The handoff layer escalates conversations to a human agent.
Your chatbot has limits. Some questions are too complex. Some visitors demand a person. Some situations need human judgment.
When handoff triggers:
- Visitor explicitly asks for a human
- Bot can't answer the question
- Conversation gets too complex
- Visitor uses certain keywords ("urgent," "complaint")
- Response gets thumbs down rating
A good handoff doesn't frustrate visitors. It feels natural. The visitor doesn't feel trapped.
How These Five Layers Connect
When you build a chatbot for website using a no-code platform, you're configuring these five components. That's why no-code builders move so fast. You're not writing code. You're configuring existing layers that already work.
Understanding these layers matters because placement and timing depend on them. Read our guide on the ideal position for a chatbot on your website to see how top performers configure each layer for maximum conversion.
Ready to see if a chatbot actually makes sense for your business? Next section reveals who benefits most and who shouldn't add one yet.
Build your free website chatbot with BotPenguin and start testing these five layers immediately.
Should You Add a Chatbot to Your Website?
Now you understand how chatbots work. The real question is whether one fits your business. Most companies benefit from adding a chatbot to their website, but only if you're clear on the specific job you want it to do. A chatbot without a primary goal becomes decoration, not a revenue driver.
The Four Most Valuable Jobs
A chatbot earns its place when it solves a specific business problem. These four jobs deliver the most measurable results.
1. Capturing and Qualifying Leads 24/7
Your sales team sleeps. Your chatbot doesn't. It greets every visitor, asks qualifying questions, and collects contact information around the clock.
Your team gets morning emails with pre-qualified leads. No more cold outreach. No more wasted conversations with unqualified prospects.
Impact: 35 to 40 percent of website visitors engage when a chatbot appears with a clear purpose.
2. Deflecting Repetitive Support Questions
Your support team answers the same questions every single day. "What are your hours?" "Do you offer refunds?" "How do I reset my password?"
A chatbot answers these instantly. Your team focuses on complex issues that actually need human attention.
Impact: Teams see 30 to 50 percent reduction in support email volume after adding a chatbot.
3. Booking Appointments or Demos
Visitors want to schedule a call. But they hate filling contact forms and waiting for callback emails. A chatbot connects directly to your calendar. Visitors book their own slots.
No back-and-forth emails. No scheduling conflicts. Direct calendar integration handles everything.
4. Assisting Purchases
A visitor on your product page has questions about features, pricing, or shipping. A chatbot answers instantly. It shows recommendations. It provides order status. It collects payment.
Purchase friction drops. Conversion rates increase. Customer satisfaction improves.
Who Should Add a Chatbot
Not every business needs one yet. But most that do share these three characteristics.
You have steady traffic
A chatbot needs visitors to work. If your website gets fewer than 100 visitors per month, a chatbot won't move the needle yet. Build traffic first. Add the chatbot when you have volume to work with.
You have recurring questions
Your support inbox contains patterns. Visitors ask similar questions repeatedly. A chatbot can answer 80 percent of these without human help.
Review your last 30 days of emails. Count the questions by topic. If you see 5 to 10 questions appearing multiple times, a chatbot will pay for itself.
You have something to convert toward
A chatbot without a conversion goal is just a novelty. You need something for it to do. A lead capture form. A calendar booking link. A product recommendation. A support ticket system.
If visitors ask questions but you have nothing to offer them, skip the chatbot for now.
Who Should Wait
Your traffic is under 100 visitors per month
A chatbot needs volume. Build traffic through SEO, ads, or content marketing first. Add the chatbot when you have something for it to work with.
Your queries are highly bespoke
If every visitor has a unique, complex question that needs human judgment, a chatbot will frustrate them. You need standardized, repeatable questions. Otherwise, the bot escalates everything to humans anyway.
You can't commit to maintaining it
A chatbot needs weekly attention. You must review conversations. You must retrain it on new information. You must update it when your business changes.
If you can't dedicate 2 to 3 hours per week to this, wait until you can.
Decision Matrix: Should You Add a Chatbot?
The Honest Rule
Add a chatbot to do a specific job. Not to look modern. Not because competitors have one. Not because "AI is hot right now."
Pick one primary goal first. Lead capture. Support deflection. Booking. Purchase assistance. Your build and your results will be far sharper.
A chatbot with one clear job outperforms a chatbot trying to do everything.
Build your free website chatbot with BotPenguin and test it against your specific goal. Start with a free plan. Prove the value before scaling.
Types of Website Chatbots: Rule-Based, AI, and Hybrid
You've decided a chatbot makes sense for your business. Now you need to choose the right type. Three main options exist, and each serves different purposes. The type you choose determines how your chatbot understands visitors, answers questions, and converts them. Understanding the differences helps you pick the right fit for your specific job.
Rule-Based Chatbots
Rule-based chatbots follow fixed menus and scripted paths. They match keywords and button clicks. When a visitor types "pricing," the bot recognizes that word and serves a pre-written response about pricing.
How it works:
- Visitor clicks a button or types a keyword
- Bot matches input to predefined rules
- Bot serves the scripted response
- No variation. No interpretation. Just pattern matching.
Best for:
Booking appointments (structured flow)
Lead qualification (fixed questions)
FAQ deflection (repetitive questions)
Guided sales funnels (step-by-step paths)
Strengths:
- Completely predictable
- You control every word
- Works with limited training
- Fast to set up
- Low cost
Weaknesses:
- Can't handle unexpected questions
- Visitors hate rigid menus
- Requires constant updates as business changes
- Frustrating when bot doesn't understand natural language
AI (Generative) Chatbots
AI chatbots understand free-form language. You don't need visitors to click buttons or use exact keywords. They ask questions naturally, and the AI grasps their intent.
How it works:
- Visitor types a question however they want
- AI analyzes the intent behind the words
- Bot searches your knowledge base
- Bot generates a natural response based on your content
- Conversation feels human-like
Best for:
- Answering varied customer questions
- Support deflection (many different issues)
- Content explanation (product details)
- Natural conversation experiences
Strengths:
- Handles natural language variations
- Visitors feel heard and understood
- Requires less rigid setup
- Works with unstructured questions
- Improves over time with more data
Weaknesses:
- Needs quality training data
- Can sometimes give unexpected answers
- Requires ongoing monitoring
- More expensive than rule-based
Hybrid Chatbots
Hybrid chatbots combine both approaches. They use AI for open-ended questions while using guided flows for conversions. This gives you flexibility plus control.
How it works:
- Visitor asks a question
- AI tries to answer from knowledge base
- If confident, bot responds naturally
- If uncertain, bot offers button menu
- Specific conversion goals use fixed flows (booking, forms, checkout)
Best for:
- Most real-world websites
- Mixed question types
- Lead capture plus support
- E-commerce (product questions plus checkout)
Strengths:
- Best of both worlds
- Handles varied questions well
- Keeps conversion funnels controlled
- Balances flexibility and predictability
- Most modern tools default to hybrid
Weaknesses:
- More complex to set up
- Needs thoughtful configuration
- Can feel disjointed if not designed well
Decision Framework
Choosing the right type depends on two factors: question variety and control needs.
High question variety + Low control needs = AI
Your visitors ask many different questions. You don't need a strict funnel. An AI chatbot learns from your content and answers naturally.
Low question variety + High control needs = Rule-Based
Your visitors ask similar questions. You need strict control (booking flow, qualification script). A rule-based bot handles this predictably.
Mixed variety + Conversion goals = Hybrid
Your visitors ask varied questions AND you need to convert them. Use AI for answering questions, guided flows for conversions.
What Most Websites Actually Need
Most real-world websites land in the middle. You have some repetitive questions but also varied ones. You need to capture leads but also answer questions. You want natural conversation plus predictable results.
A hybrid chatbot serves this perfectly. Modern no-code builders let you mix AI answers with structured flows on the same bot. You get the flexibility of AI and the control of rule-based in one system.
When you build a chatbot for website with BotPenguin, you can start with AI and add guided flows wherever you need them. No need to choose one type and commit to it forever.
Ready to see how to actually build and install your chatbot? The next section walks through four different methods, from fastest to most technical.
Build your free website chatbot with BotPenguin and test both rule-based and AI approaches with no commitment.
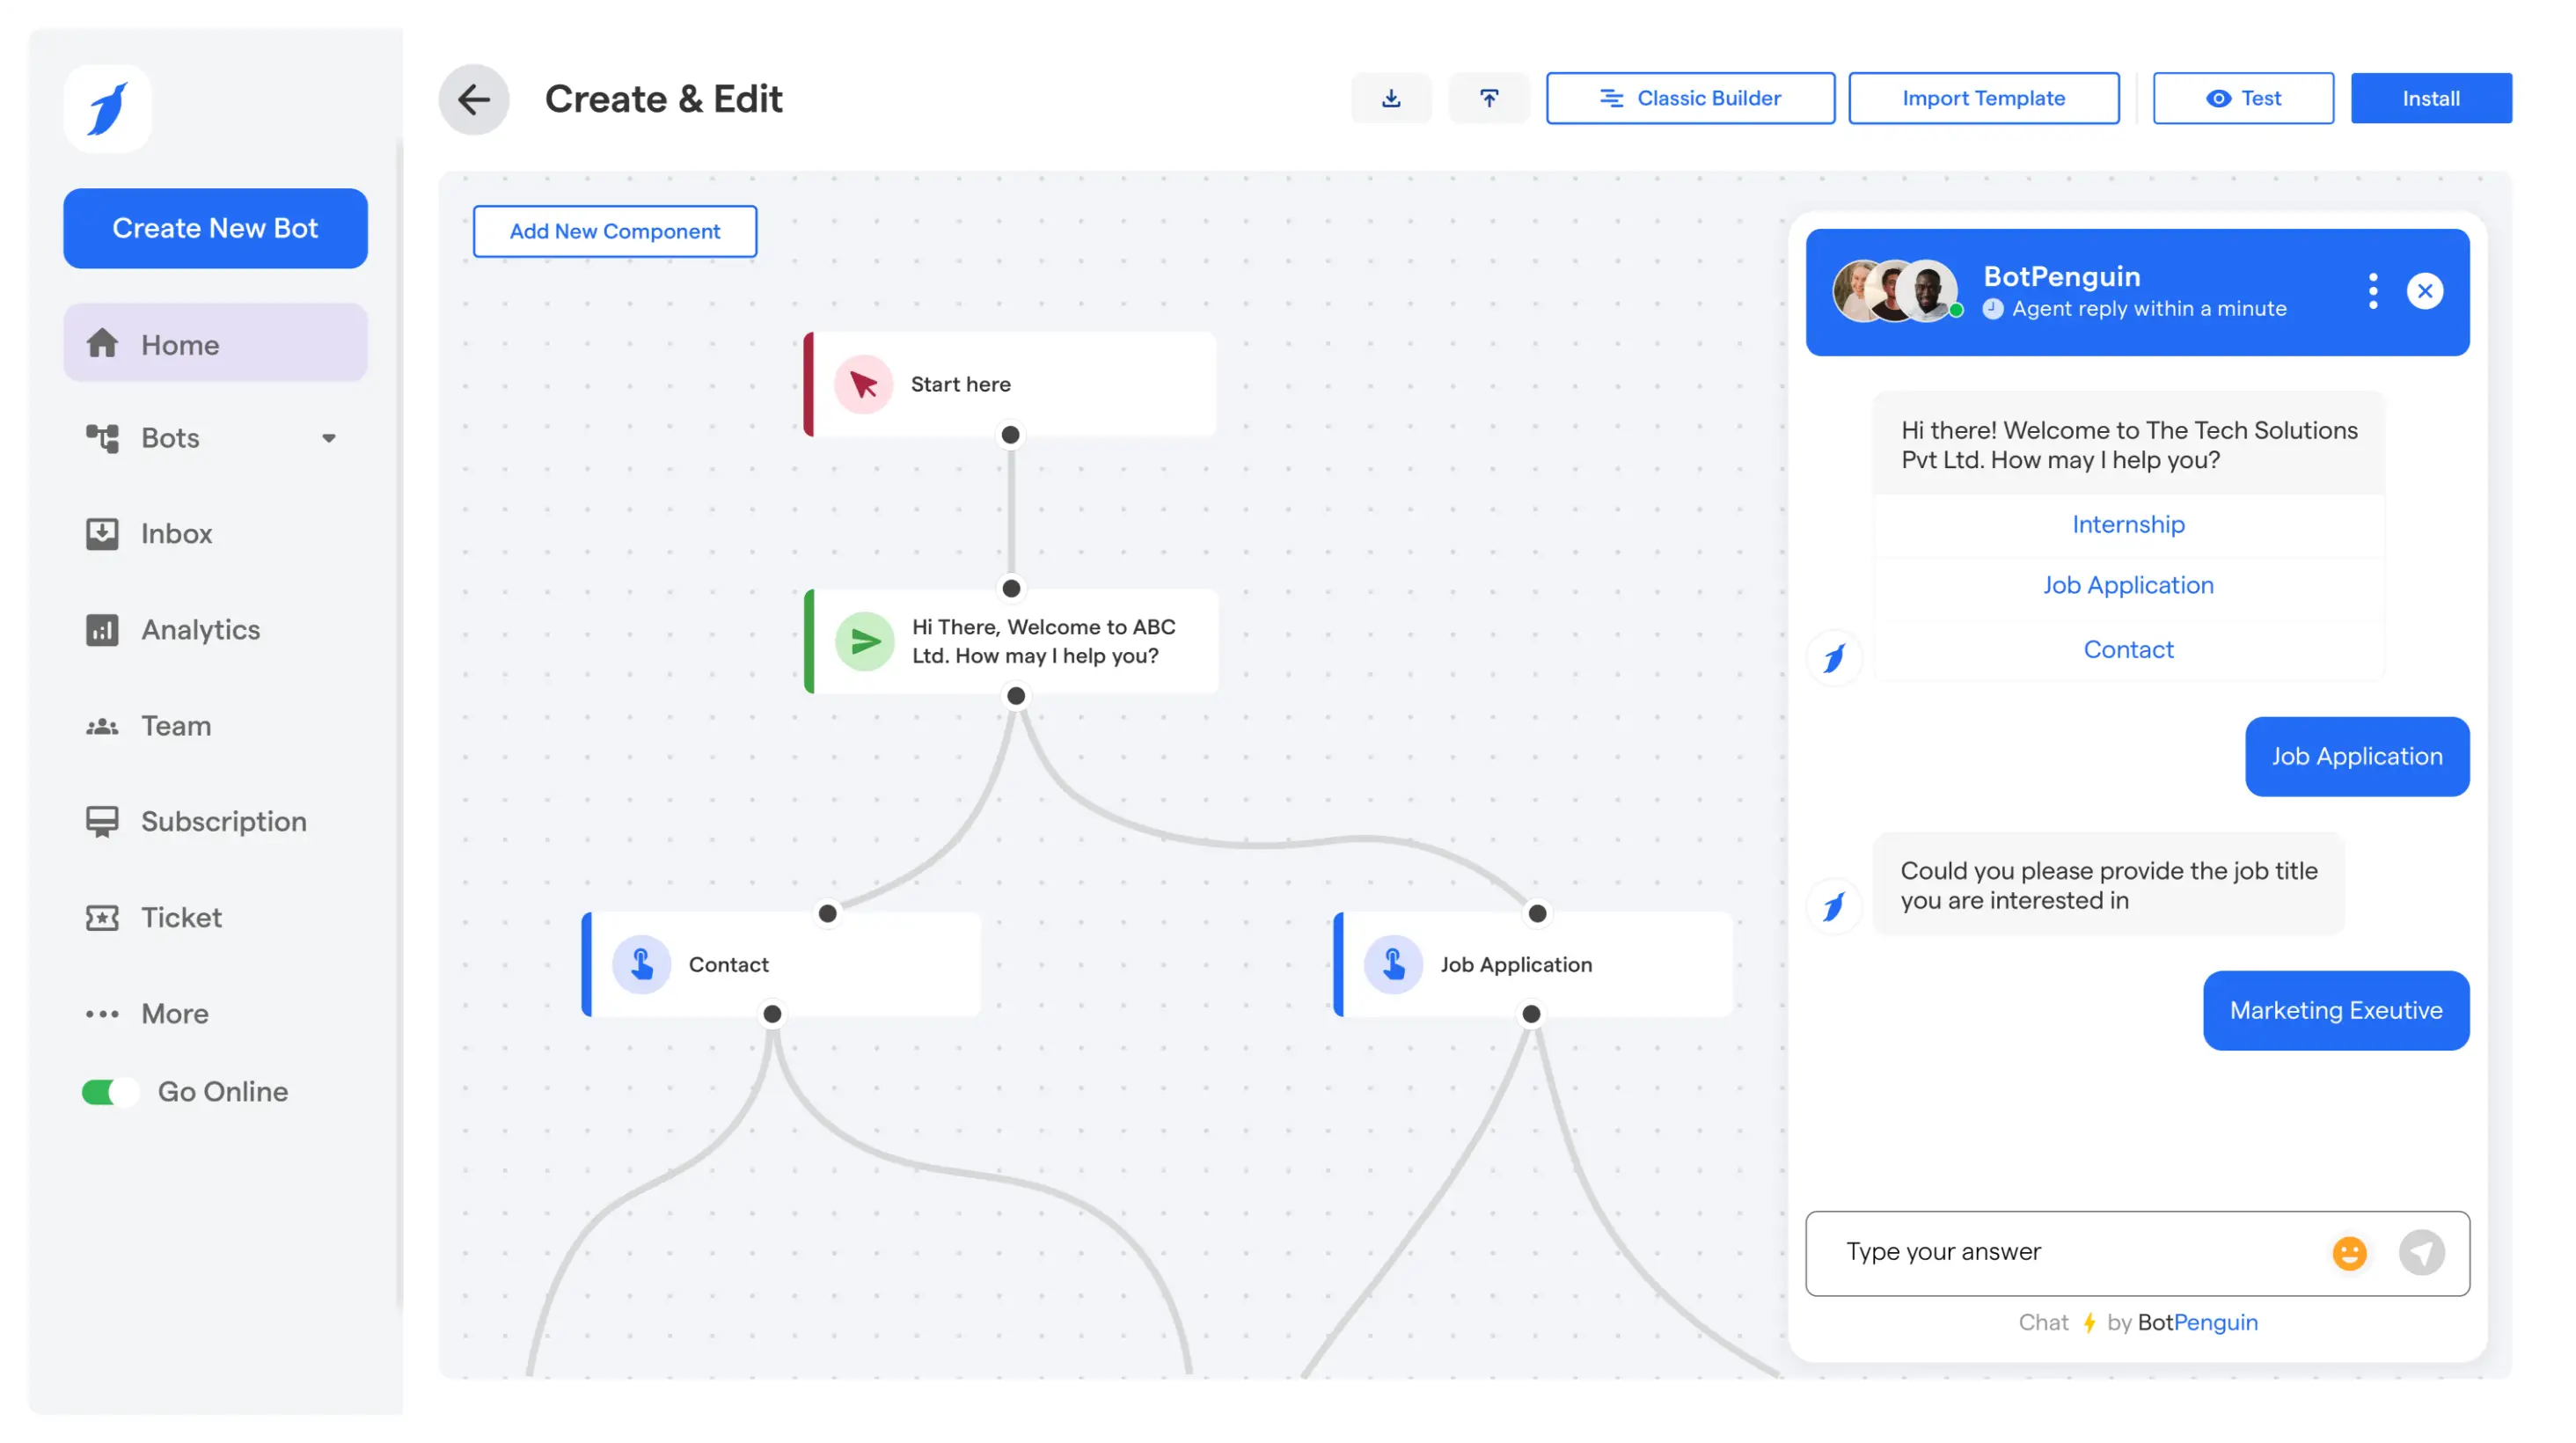
How to Add a Chatbot to Your Website in 5 Steps
You've chosen your chatbot type and installation method. Now comes the actual build. This five-step process works for any website and any modern builder. Most people complete all steps in under an hour.
Quick Overview
Step 1: Sign Up Free
Go to BotPenguin. Click "Start Free." No credit card needed. You're in immediately.
Step 2: Build Your Conversation
Use drag-and-drop to create your bot's responses.
Add:
- Greeting message (tell visitors what you can help with)
- Response paths (answer common questions)
- Contact form (if capturing leads)
- Human handoff button (for escalation)
Start simple. Refine later based on real conversations.
Step 3: Train on Your Content
Point the AI to your actual information.
Options:
- Enter your website URL (auto-crawl)
- Upload PDFs or documents
- Add Q&A pairs for critical topics
- Paste key business info
The better your training data, the better your answers.
Step 4: Customize and Set Triggers
Match your brand. Choose when it appears.
Customize:
- Logo and colors
- Widget size and position
- Welcome message
Set timing:
- Immediate (pricing pages)
- 5-10 second delay (blog posts)
- Exit intent (checkout pages)
Step 5: Install and Test
Copy the code. Paste it on your site. Test it.
Installation:
- HTML sites: paste before closing body tag
- WordPress: install plugin
- Shopify: install app
- Wix/Squarespace: code injection in settings
Visit your site. Test the chatbot. Confirm it works.
Done. Your chatbot is live. Review conversations weekly and retrain as your business changes.
Build your free website chatbot with BotPenguin and launch in minutes.
How to Add a Chatbot to WordPress, Shopify, Wix, Squarespace & Custom Sites
The five steps above work for any website. But each platform has a faster route. You don't need to copy-paste code if you're on WordPress or Shopify. Use the platform-specific method instead. It takes minutes and requires zero code knowledge.
WordPress
Fastest method: Install the plugin
- Go to Plugins → Add New
- Search "BotPenguin"
- Click Install Now, then Activate
- Connect your BotPenguin account
- Select your chatbot
- Done. It appears on your site automatically.
No theme edits. No code touching. The plugin handles everything.
Alternative: Paste code snippet
If you prefer manual control, go to Settings → Custom Code in BotPenguin and paste the snippet into a Code Snippets plugin.
When you add a chatbot to a WordPress website this way, the chatbot plugin for website works on every page automatically. Check out our WordPress chatbot setup for more details.
Shopify
Method: Install the app
- Go to Apps and sales channels
- Search BotPenguin in the Shopify app store
- Click Add app
- Authorize the connection
- Select your chatbot
- Done. Widget displays on your storefront.
Your chatbot now greets customers on product pages, cart, and checkout. Perfect for handling product questions and abandoned cart recovery.
Wix
Method: Code injection
- Go to Settings → Custom Code
- Click Add Custom Code
- Paste the BotPenguin script
- Select Apply to All Pages
- Click Apply
- Done.
The chatbot appears across your entire Wix site. No plugin needed. No manual installation per page.
Squarespace
Method: Code injection in site settings
- Go to Settings → Advanced → Code Injection
- Paste the BotPenguin script in the Footer section
- Click Save
- Done.
Squarespace loads the code on every page automatically. Your chatbot works across the entire site.
Webflow
Method: Native embed or code injection
- Build your chatbot in BotPenguin
- Copy the JavaScript snippet
- In Webflow, go to Project Settings → Custom Code
- Paste in the Footer Code section
- Publish
- Done.
Alternatively, Webflow supports embed elements. You can paste the script directly into a custom embed block.
Custom HTML Sites
Method: Paste in shared template
For static HTML or custom-built sites, paste the snippet in your shared header or footer template so it loads on every page.
- Copy the BotPenguin script
- Open your website template
- Paste before the closing body tag
- Save and publish
- Done.
The script loads asynchronously, so it won't slow your site.
Platform Comparison
Which Method Should You Use?
If your platform has a plugin or app, use it. It's the fastest and requires zero code knowledge.
If your platform doesn't have a native option, use code injection or paste the snippet. Both work equally well.
The snippet method works everywhere. Pick whichever feels easiest for your platform.
Your chatbot is now live on your specific platform. The next section covers best practices to actually make it convert and stop it from becoming invisible.
Best Practices to Make Your Website Chatbot Convert
Your chatbot is live. Now comes the hard part: making it actually convert. Installation takes minutes. Conversion takes strategy. A well-placed, well-trained, and well-measured chatbot becomes a revenue driver. A neglected one becomes invisible decoration.
1. Place It Where Visitors Expect It
Bottom-right corner is standard. Visitors know to look there. Don't put it top-left or center of screen. Don't make it huge. Let it be helpful, not intrusive.
2. Tailor Triggers by Page
Different pages need different timing.
Match timing to visitor intent. A pricing page visitor wants answers now. A blog reader needs context first.
3. Train on Real Content, Not Marketing Copy
Your knowledge base makes or breaks conversion.
Good training data:
- Real support emails
- Customer FAQ lists
- Actual product specs
- How-to guides written for customers
- Common objection responses
Bad training data:
- Marketing copy (too salesy)
- Vague descriptions (too general)
- Outdated information (confuses AI)
- Competitor content (irrelevant)
When you create a chatbot for website with poor training, visitors get unhelpful answers. When you train it on real customer language, they get solutions.
4. Review Unanswered Questions Weekly
Your chatbot learns from real conversations.
Every week:
- Check your BotPenguin dashboard
- Look for questions the bot couldn't answer
- Look for responses visitors rated unhelpful
- Add missing information to knowledge base
- Remove outdated content
This weekly review transforms your chatbot from static to smart. It gets better every week because you're feeding it real data.
5. Give It Clear, On-Brand Voice
Your chatbot should sound like your business, not like a generic bot.
Write a personality brief:
- Your tone (friendly, professional, casual, expert)
- Your values (speed, accuracy, empathy, expertise)
- Your common phrases or style quirks
- 2-3 sample responses in your voice
Use this brief when configuring your chatbot's instructions. It ensures every response feels like it comes from your brand.
A skateboard shop bot and a law firm bot shouldn't sound identical. They shouldn't both say "How can I assist you today?"
6. Set Clear Expectations in Your Greeting
Your opening message determines engagement.
Bad: "Hi! How can I help?" Good: "I can help with pricing, shipping, returns, and product setup."
The second tells visitors exactly what you can do. More of them engage because they know you can solve their problem.
7. Capture and Qualify Leads, Don't Just Answer
If lead capture is your goal, ask for contact info before giving too much away.
Effective flow:
- Bot answers initial question
- Bot offers deeper help
- Bot asks for email to send detailed info
- Visitor provides email
- Bot sends info and marks as qualified lead
You've turned a conversation into a contact.
8. Always Offer Handoff to Humans
Visitors don't hate AI. They hate feeling trapped by it.
Set up handoff when:
- Visitor explicitly asks for a human
- Bot can't answer the question
- Conversation gets too complex
- Visitor uses keywords ("urgent," "complaint," "problem")
Offer multiple channels: email, phone, chat, WhatsApp. Make the handoff feel natural, not like a last resort.
9. Measure What Actually Matters
Track these four metrics.
Without measurement, you're guessing. With metrics, you're improving based on data.
Review these numbers monthly. If engagement is low, improve your greeting. If resolution is low, retrain your knowledge base. If escalation is high, adjust scope.
You now have a chatbot that's installed, trained, and optimized for conversion. But does it slow down your site? Is it safe? The next section covers performance and compliance.
Explore websites that use chatbots to see real conversion examples.
How Much Does It Cost to Add a Chatbot to Your Website?
You can add a capable chatbot for free. Free plans aren't limited trials. They're genuine free tiers with real features. Start free. Prove the value. Then upgrade only when you need more.
Free Forever Plan
BotPenguin's free plan includes:
- No-code builder
- AI training on your content
- Monthly message allowance
- Full customization
- Analytics and reporting
- No credit card required
Enough for many small sites. Capture leads and answer visitors without spending anything.
Custom Development
Building your own chatbot from scratch costs thousands in developer time and ongoing maintenance. Most teams should start with no-code and only invest in custom work for genuinely unusual needs.
Reality check: No-code gives you 90 percent of the capability at a fraction of the cost. You can still add custom integrations later if needed.
Now you know how to create a chatbot for website end to end. You understand the five layers, the installation methods, the best practices, and the costs. The last section covers the mistakes most teams make and how to avoid them.
Ready to scale? Check our pricing page to see all plan options and features.
6 Mistakes to Avoid
Most chatbot failures trace back to the same mistakes. These aren't technical problems. They're configuration and strategy problems. Avoid these six and your chatbot will convert.
1. Over-Automating Everything
Hiding the human option frustrates visitors. They don't hate AI. They hate feeling trapped by it.
Always offer a way to reach a person. Make it easy. Make it visible. Make it natural.
2. Training on Marketing Copy
Your chatbot sounds robotic when trained on marketing pages. "Discover our innovative solutions" confuses the AI.
Train on real support emails. Real customer questions. Real how-to documentation. Real edge cases. This produces helpful answers.
3. Wrong Placement or Timing
An instant pop-up on every page annoys visitors. So does a bot that never appears.
Match triggers to intent:
- Blog posts: 5-10 second delay
- Pricing page: immediate
- Checkout: exit intent
- Contact page: don't show
4. No Clear Primary Goal
A chatbot trying to do everything converts nothing. It needs one job.
Pick one: lead capture, support deflection, booking, or purchase assistance. Build everything around that goal.
5. Set-and-Forget Approach
Your chatbot gets worse if you ignore it. Review conversations weekly. Update the knowledge base. Retrain monthly.
Neglected chatbots become invisible. Maintained chatbots become revenue drivers.
6. No Measurement
Without metrics, you're guessing. Track these:
- Engagement rate (target: 35-40%)
- Resolution rate (target: 75%+)
- Escalation rate (target: under 15%)
Adjust based on data.
Conclusion
You now know how to add a chatbot to your website end to end. Whether you're wondering how to make a chatbot for website visitors or just getting started, the answer is the same: pick one goal, follow the five steps, and launch today.
The whole thing takes minutes, not weeks. No code required. The real win comes after launch. Train the bot on your content. Position it well. Capture and qualify leads. Refine from real conversations.
Your website no longer sits silent. Visitors arrive with questions. Your chatbot answers instantly. Captures their information. Books meetings. All while you sleep.
Build your free website chatbot with BotPenguin today and turn your website into a 24-hour sales and support machine.
No credit card. No commitment. Start free. Prove the value. Then scale.
Frequently Asked Questions (FAQ)
How do I add a chatbot to my website for free?
Use a no-code tool with a free plan, such as BotPenguin. Sign up with no credit card. Build from a template or drag-and-drop editor. Train on your website content. Paste the script into your header or footer, or use a one-click plugin for WordPress, Shopify, Wix, or Squarespace.
The bot goes live immediately. Free plans include a monthly message allowance sufficient for small and growing sites. Capture leads and answer visitors without spending. Upgrade only when traffic grows.
Can I add a chatbot to my website without coding?
Yes. Modern builders are fully no-code. Design conversation visually with drag-and-drop blocks or ready-made templates. Customize to match your brand. Install by pasting one script snippet or using a one-click plugin.
No programming. No theme editing. No developer needed. Most non-technical users build and launch in under an hour. Then refine over time by reviewing real conversations.
How do I add a chatbot to a WordPress website?
Install the chatbot plugin from your builder. Connect to your account. The bot appears automatically. No theme file editing.
Alternatively, paste the script into header or footer using a code-snippet plugin. Both take minutes. Manage everything from the dashboard afterward. No WordPress code touching needed.
How do I add a chatbot to an HTML website?
Build and configure in your no-code builder. Copy the JavaScript snippet. Paste just before the closing body tag in your page template.
The script loads asynchronously, so it won't slow your page. If your site uses a shared header or footer, add the snippet once. No backend changes needed.
How long does it take to add a chatbot to a website?
For most websites, minutes. Building conversation flow takes the most time, even with templates. Installing and testing takes a few clicks.
Training the AI on your content takes a bit longer, but you can launch first and refine afterward. Plan an afternoon to do it well. Plan ten minutes for a basic version live.
Will adding a chatbot slow down my website?
No, when implemented correctly. Reputable scripts load asynchronously. They load after your page content. They don't block rendering or affect Core Web Vitals.
The provider hosts processing on its infrastructure, not your visitor's browser. Use the official snippet or plugin. Avoid stacking multiple chat tools. Done right, visitors get instant chat with zero performance penalty.
AI vs rule-based chatbot: which is better?
It depends on question variety and control needs.
Rule-based bots follow fixed menus. Predictable. Ideal for booking or qualification.
AI bots understand natural language. Answer from trained knowledge base. Better for open-ended questions.
For most websites, hybrid wins. AI handles free-form questions. Guided flows drive conversions. Modern builders combine both.
What's the best chatbot to add to a website?
Look for:
- No-code builder
- AI that trains on your content
- Easy installation
- Integrations you need
- Free plan to test
BotPenguin meets all these for most websites. Start with a free plan and validate before committing.